Learning how to use a blender properly can transform your kitchen experience, making meal prep faster and more creative. A blender is a versatile appliance that chops, mixes, or liquefies ingredients with high-speed blades, perfect for smoothies, soups, sauces, and more. Whether you’re a beginner or looking to refine your skills, this blender user guide will teach you the essentials of how to use a blender properly for consistent, safe results.
Blenders are popular for their ability to simplify cooking with blender, from whipping up a quick breakfast smoothie to grinding nuts for homemade spreads. This guide covers everything you need to know: from blender setup and blender safety to blender troubleshooting and best blender tips. We’ll walk you through preparing ingredients, selecting the right modes, and maintaining your blender for long-term use. Curious about how to make smoothie in blender or exploring blender recipes? You’re in the right place.
Whether you own a countertop model or a portable blender, mastering how to use a blender properly ensures efficiency and safety. For more resources, check out blender guide. Let’s dive into this step-by-step journey to blend like a pro!

What You Need Before Using a Blender
Before you start exploring how to use a blender properly, preparation is key. This section outlines the essentials to ensure a smooth blending experience, covering accessories, compatibility, safety, and basic setup.
Required Accessories
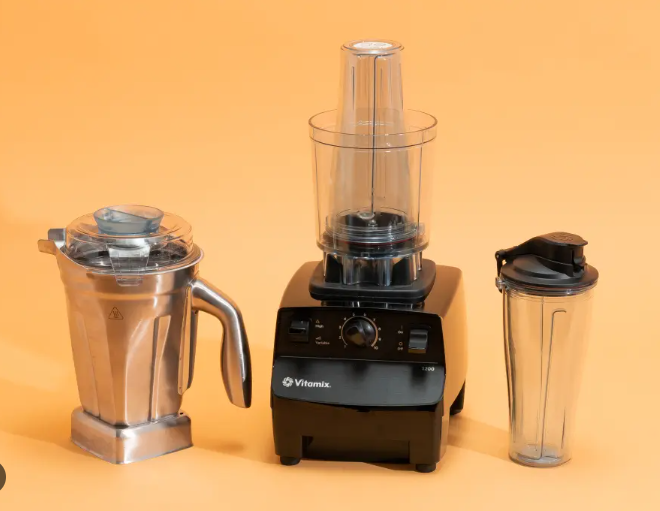
Most blenders come with a motor base, a blending jar, a lid, and sometimes a tamper for pushing ingredients toward the blades. For tasks like grinding spices or making nut butters, a tamper is especially useful. Some models include a measuring cap in the lid for adding liquids gradually. If these aren’t included, check with the manufacturer for compatible add-ons.
For a portable blender, ensure you have a charging cable if it’s battery-powered. Standard blenders require a stable power outlet, so consider an extension cord for kitchens with limited sockets. Cleaning tools, like a soft sponge or brush, are vital for blender maintenance to keep your appliance in top shape after use.
Compatibility Check
Blenders vary in capacity, jar type, and power. Smaller jars (20-32 ounces) are ideal for single servings, while larger ones (48-64 ounces) suit family-sized batches. Glass jars resist odors but are heavier; plastic jars are lightweight and durable. Choose based on your needs, such as how to make smoothie in blender for one or preparing soups for a group.
Power ranges from 300 watts for basic tasks to 1500 watts for heavy-duty blending, like crushing ice. For frozen ingredients, aim for at least 600 watts to avoid motor strain. Verify your blender’s specs match your intended use to prevent issues requiring blender troubleshooting.
Safety Requirements
Blender safety is non-negotiable. Always read the manual for model-specific warnings. Use a grounded outlet to prevent electrical hazards and place the blender on a stable, flat surface to avoid tipping. Never operate without a secure lid, as high-speed blades can cause splashes.
For households with children, store the blender out of reach and supervise use. Handle sharp blades carefully during assembly or cleaning. Many blenders have safety locks that prevent operation if the jar isn’t properly attached—test this feature before blending.
Basic Preparation
Wash the jar, lid, and any removable parts with warm soapy water before first use to remove residues. Dry thoroughly to avoid diluting blends. Chop ingredients into 1-2 inch pieces to ease blending and reduce motor strain. Test the blender empty by running it on low for a few seconds to check for odd noises or vibrations, ensuring proper blender setup. These steps set the foundation for learning how to use a blender properly.
Step-by-Step Blending Guide
This section is the heart of learning how to use a blender properly. We’ll break down the process into clear steps, covering ingredient prep, setup, mode selection, blending, testing, and troubleshooting. Whether you’re mastering how to make smoothie in blender or trying advanced blender recipes, this guide ensures success.
Preparing Ingredients
Start with ingredient preparation. Wash fruits and vegetables thoroughly to remove dirt or pesticides. For smoothies, peel items like bananas or mangoes and remove pits from fruits like cherries. Cut ingredients into 1-2 inch pieces to help the blades process them efficiently—large chunks can cause jams.
For frozen ingredients, let them thaw slightly to ease blending. Measure liquids like water or milk carefully, starting with less to avoid overly thin results. When learning how to make smoothie in blender, layer ingredients strategically: liquids first, then soft fruits, greens, and finally frozen items or ice. This creates a vortex for smooth blending. Don’t fill the jar beyond two-thirds to allow room for expansion, preventing leaks or uneven blends.
Setting Up the Blender
Proper blender setup ensures safe and effective operation. Place the base on a dry, stable counter. Attach the jar securely, twisting until it locks—many models click to confirm. Add your ingredients, then secure the lid tightly. Some lids have a removable cap for adding ingredients mid-blend or venting steam for hot mixtures.
Plug in the blender and review the controls. Most offer low-to-high speed settings and a pulse function. Advanced models may have presets for smoothies, ice crushing, or soups. Start on low to break down ingredients, then increase speed for a finer texture. For more setup advice, see blender.

Selecting Modes
Choosing the right mode enhances your results. For how to make smoothie in blender, use the smoothie preset if available—it cycles speeds for a creamy texture. Ice crush mode pulses to break down ice without melting it, ideal for frozen drinks. Soup mode, found on high-end models, heats ingredients through friction, perfect for cooking with blender.
If no presets, manually start on low for 20-30 seconds, then switch to high for 1-2 minutes. Use pulse for chunky textures like salsas. For nut butters or blender recipes like hummus, high-speed blending ensures smoothness. Never leave the blender unattended on high to maintain blender safety.
Blending Process
Press start on low to begin, then gradually increase speed. Blend for 30-60 seconds for smoothies or 2-5 minutes for thicker mixtures like nut butters. Use the tamper through the lid’s opening to push ingredients toward the blades, especially for dense blends. Avoid using other utensils to prevent damage or injury.
If ingredients stick, unplug the blender and scrape the sides with a spatula. Resume blending, adding small amounts of liquid if needed. Listen for a steady hum—grinding noises may indicate a jam or overload, signaling a need for blender troubleshooting.
Testing the Blend
After blending, unplug and remove the jar. Pour a small sample to check consistency—smoothies should be creamy, soups velvety. If too thick, add liquid and blend briefly. Taste and adjust sweetness or seasoning. If gritty, blend longer on high. This step ensures your blend meets expectations, a key part of how to use a blender properly.
Troubleshooting Common Issues
Even with proper blender setup, issues can arise. If the blender won’t start, check the power connection and jar alignment—safety locks may prevent operation if misaligned. Overheating? Unplug and cool for 15-30 minutes; avoid running beyond 3 minutes continuously.
Leaks often result from loose lids or worn seals—tighten or replace. If blades jam, unplug and clear debris with a spatula, not fingers. For ongoing issues, consult the manual or visit blending tips for detailed blender troubleshooting.
Tips for Successful Blending
Mastering how to use a blender properly involves more than just operation. These best blender tips cover cleaning, safety, and efficiency to keep your blender performing well.
Cleaning Your Blender
Blender maintenance starts with cleaning. Rinse the jar immediately after use to prevent residue buildup. For a quick clean, fill halfway with warm water, add a drop of dish soap, and blend on low for 30 seconds. Rinse and dry thoroughly. For stubborn stains, use a soft brush to scrub blades safely.
Wipe the base with a damp cloth—never submerge it. Regular cleaning ensures hygiene and extends your blender’s life, whether it’s a countertop model or a portable blender.
Safety Precautions
Blender safety is critical. Always unplug before cleaning or assembling. Keep hands and non-tamper utensils out of the jar during operation. For hot liquids, cool slightly and vent the lid to avoid pressure buildup. Check for jar cracks or worn seals regularly to prevent leaks or hazards.
Energy-Saving Tips
High-powered blenders consume significant energy. Blend in short bursts (1-2 minutes) and use the pulse function for quick tasks like chopping. For portable blender users, charge only when needed to preserve battery life. Batch-prep ingredients to reduce blending sessions.
Best Blending Practices
For consistent results, add liquids first, followed by soft items, greens, and frozen ingredients. Cut uniformly for even blending. Avoid mixing hot and cold items to prevent jar damage. Experiment with blender recipes like dips or sauces to expand your skills.
Frequently Asked Questions
Here are answers to common questions about how to use a blender properly, addressing beginner concerns.
What Happens If My Blender Overheats?
Overheating occurs from prolonged use or thick mixtures. If it stops, unplug and let it cool for 15-30 minutes. Prevent this by blending in short intervals and ensuring proper ingredient layering, as outlined in this blender user guide.
How Do I Fix Common Blender Issues?
For blender troubleshooting, check power and jar alignment if it won’t start. Clear blade jams safely after unplugging. Leaks may indicate loose lids or worn seals—tighten or replace. Persistent issues may require checking the manual or manufacturer support.
Do I Need Professional Help for Repairs?
Minor issues like jams or loose parts can be fixed at home. For electrical or motor problems, professional repair is safer, especially under warranty. Prioritize blender safety and avoid DIY fixes for complex issues.
Is a Portable Blender Good for Travel?
A portable blender is excellent for travel due to its compact size and battery power, ideal for quick smoothies. Check TSA rules for carrying it. For heavy-duty tasks, stick with a countertop model.
Conclusion
Mastering how to use a blender properly unlocks a world of culinary creativity. From how to make smoothie in blender to crafting soups and sauces, blenders simplify meal prep while offering versatility. This guide covered blender setup, blender safety, blender maintenance, and blender troubleshooting, equipping you to blend with confidence.
With proper care, your blender—whether a countertop powerhouse or a portable blender—will serve you for years. Start with simple blender recipes and explore new flavors. For more best blender tips, visit blending tips. Get blending and enjoy the delicious results!