Creating delicious blender recipes for dinner relies on a well-functioning blender, and one of the most critical components is the blade. Over time, blender blades can become dull or damaged, affecting performance and the quality of your soups, sauces, or smoothies. Knowing how to replace blender blade is a valuable skill that can extend your blender’s life and keep your dinner prep seamless. In this comprehensive guide, we’ll walk you through the step-by-step process of replacing a blender blade, share tips on blender setup, blender maintenance, and blender troubleshooting, and provide some blender recipes for dinner to inspire your next meal. Let’s get your blender back in top shape!
Why Replace a Blender Blade?
A blender’s blade is the heart of its operation, responsible for chopping, pureeing, and blending ingredients into smooth or textured consistencies. Over time, blades can wear out due to frequent use, especially with tough ingredients like nuts or frozen fruits. Dull or damaged blades lead to uneven blending, longer processing times, and strain on the blender motor life. Replacing the blade restores efficiency, ensuring your blender recipes for dinner turn out perfectly. For more on maintaining your blender, check out the best blender guide.
Signs Your Blender Blade Needs Replacing
Before diving into how to replace blender blade, identify whether your blade needs attention. Look for these signs:
- Poor blending performance: If your blender struggles to puree ingredients smoothly or leaves chunks, the blade may be dull.
- Visible damage: Cracks, chips, or rust on the blade indicate it’s time for a replacement.
- Leaking jar: A worn blade assembly or seal can cause leaks during blending.
- Unusual noises: Grinding or rattling sounds may suggest a loose or damaged blade.
If you notice these issues, replacing the blade can save you from buying a new blender and keep your blender recipes for dinner on track.
Step-by-Step Guide: How to Replace Blender Blade
Replacing a blender blade is a straightforward process with the right tools and precautions. Follow these steps to ensure blender safety and success.
Step 1: Gather Your Tools and Replacement Blade
- A replacement blade compatible with your blender model (check the manual or manufacturer’s website).
- A screwdriver (if screws secure the blade assembly).
- A wrench or pliers (for models with a nut securing the blade).
- A towel or cloth to protect your hands and surfaces.
- A small brush for cleaning.
Blender Tip: Always purchase a blade from the manufacturer or a trusted retailer to ensure compatibility. For help choosing the right parts, visit blenderreviewz.com.
Step 2: Unplug and Disassemble the Blender
For blender safety, unplug the blender to avoid accidental activation. Remove the blender jar from the base and turn it upside down. If the blade assembly is detachable, you may need to unscrew or unclip it. Some models have a removable bottom plate or collar holding the blade in place.
Blender Troubleshooting: If the blade assembly is stuck, soak the jar in warm, soapy water for 10 minutes to loosen debris.
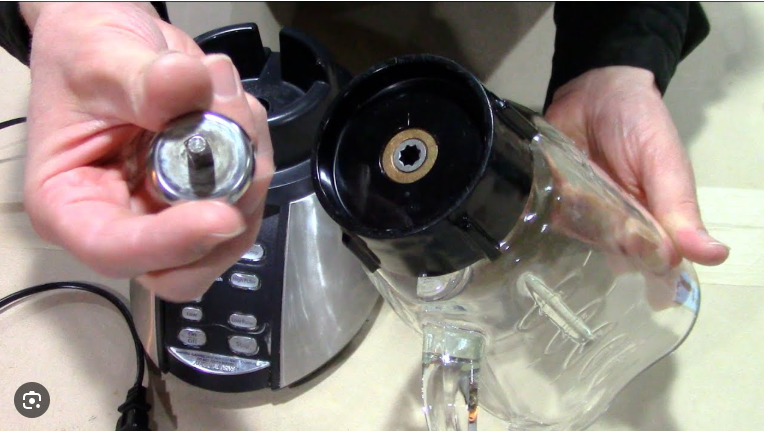
Step 3: Remove the Old Blade
Carefully unscrew or unfasten the blade assembly. Most blenders have a threaded nut or screws securing the blade. Use a wrench or screwdriver to loosen it, turning counterclockwise. Hold the jar steady with a towel to protect your hands from sharp edges.
Blender Safety: Wear gloves if the blade is sharp or rusted to avoid cuts.
Step 4: Clean the Jar and Assembly Area
Before installing the new blade, clean the jar’s base and any seals or gaskets with a brush and soapy water. This prevents residue from affecting the new blade’s performance and ensures a tight seal to avoid leaks.
Blender Maintenance: Regularly cleaning the blade area prevents buildup and extends blender motor life.
Step 5: Install the New Blade
Attach the new blade assembly by aligning it with the jar’s base. Secure it by tightening the nut or screws clockwise. Ensure the blade spins freely and the seal is snug to prevent leaks. If your blender uses a gasket, replace it if worn to maintain a watertight seal.
Blender Tip: Check the manufacturer’s instructions for your model, as some require specific torque settings for tightening.
Step 6: Test the Blender
Reassemble the blender, place it on the base, and plug it in. Test with a small amount of water to check for leaks or unusual noises. If everything runs smoothly, your blender is ready for blender recipes for dinner.
Blender Troubleshooting: If the blade doesn’t spin or leaks occur, double-check the assembly and ensure all parts are tightly secured.
Blender Recipes for Dinner to Test Your New Blade
With your new blade installed, put it to work with these delicious blender recipes for dinner. These recipes showcase your blender’s ability to create smooth, flavorful dishes.
1. Creamy Broccoli Cheddar Soup
This rich soup is perfect for testing your new blade’s pureeing power.
- Ingredients:
- 2 cups broccoli florets, steamed
- 1 small onion, chopped
- 1 clove garlic
- 1 cup cheddar cheese, shredded
- 2 cups vegetable broth
- ½ cup heavy cream
- 1 tbsp olive oil
- Salt and pepper to taste
- Instructions:
- Sauté onion and garlic in olive oil until soft.
- Add broccoli, broth, and cream to the blender. Blend until smooth.
- Heat the mixture in a pot, stir in cheese, and season. Serve hot.
Blender Tip: Start on low speed to avoid splashing, then increase to high for a velvety texture.
2. Roasted Garlic Hummus
This smooth dip tests your blade’s ability to handle dense ingredients like chickpeas.
- Ingredients:
- 1 can chickpeas, drained
- 2 cloves roasted garlic
- ¼ cup tahini
- 2 tbsp olive oil
- 2 tbsp lemon juice
- ¼ cup water
- Salt to taste
- Instructions:
- Add all ingredients to the blender.
- Blend on medium-high, scraping down sides as needed, until creamy.
- Serve with pita or veggies.
Blender Tip: Add water gradually to achieve the desired consistency without overloading the motor.

3. Spicy Avocado Sauce
This versatile sauce is great for tacos or as a salad dressing, showcasing your blade’s precision.
- Ingredients:
- 1 ripe avocado
- 1 jalapeño, seeded
- ¼ cup cilantro
- 1 tbsp lime juice
- ¼ cup Greek yogurt
- ¼ cup water
- Salt to taste
- Instructions:
- Add all ingredients to the blender.
- Blend until smooth, adding more water if needed.
- Drizzle over tacos or use as a dip.
Blender Tip: Use the pulse function for a chunkier texture if desired.
Blender Maintenance After Blade Replacement
Replacing the blade is a great start, but ongoing blender maintenance ensures long-term performance:
- Clean immediately: Rinse the new blade and jar after each use to prevent food buildup.
- Inspect regularly: Check the blade and seals for wear every few months.
- Avoid overloading: Don’t overfill the jar to prevent strain on the new blade and motor.
- Store properly: Keep the blender in a dry, dust-free area to protect components.
Proper care extends your blender’s motor life and keeps it ready for more blender recipes for dinner.
Blender Troubleshooting Post-Replacement
If issues arise after replacing the blade, try these blender troubleshooting tips:
- Blade doesn’t spin: Ensure the blade is properly aligned and the nut is tightened securely.
- Leaks: Check the gasket and seals for proper placement or damage.
- Unusual noises: A loose blade or debris may be the cause—disassemble and clean thoroughly.
- Poor blending: If results are uneven, the replacement blade may not be compatible. Verify it matches your model.
For more blender troubleshooting solutions, explore blending tips at blenderreviewz.com.
Blender Safety Tips When Replacing Blades
Working with blades requires caution. Follow these blender safety tips:
- Unplug the blender: Always disconnect the power before handling the blade.
- Use protective gear: Wear gloves when removing or installing sharp blades.
- Handle with care: Avoid touching the blade edges directly to prevent cuts.
- Secure the jar: Ensure the jar is stable during assembly to avoid spills or accidents.
Can a Portable Blender Blade Be Replaced?
Replacing blades on a portable blender can be trickier, as many models have sealed blade assemblies. Check your manual to see if the blade is replaceable. If not, you may need to replace the entire jar or unit. For portable blender maintenance tips, visit blenderreviewz.com.
Conclusion: Keep Your Blender Ready for Dinner Success
Learning how to replace blender blade is a simple yet effective way to maintain your blender’s performance and continue enjoying delicious blender recipes for dinner. By following the steps outlined, practicing blender safety, and incorporating regular blender maintenance, you can ensure your blender remains a reliable kitchen companion. Whether you’re whipping up creamy soups or zesty sauces, a sharp new blade makes all the difference. For more blender tips and troubleshooting advice, check out the best blender guide at blenderreviewz.com. Happy blending and bon appétit!